The Martin FireFly star, a great tree topper.
This lighting fixture uses a D-Light.us "FireFly" which is a 16 pixel string of RGB LEDs. You can create more colors than you can keep track of with each pixel and it works with the Light O Rama control software straight out of the box.The finished star, approximately 22" in size, ready to mount on top of our Mega Tree.

A quick sequence showing off the Star's capabilities. Song 'Explosive' by Bond.
The Martin FireFly Star from GaryMartin2002 on Vimeo.
Okay, so you want to build one yourself now? Great! Let's go over what all goes into this project. Obviously the first thing you need is a FireFly strand from D-Light.us Next, you need some 1/8" cold rolled steel. Five sticks, 48" long is enough to do this project. I used a 1/4" L bracket piece to make my mount as well, but there are many options for a mount, including just some keyhole slots to set the star on screws.
Here's the design:
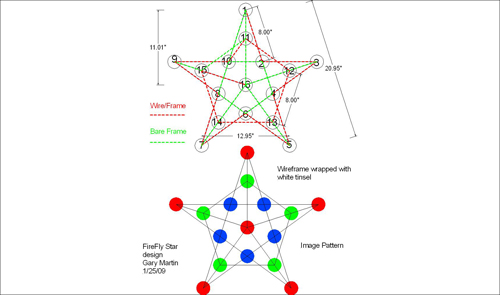
The outer star shape is made from two pieces of the 1/8" steel rod, the inner pentagram is shaped from one single piece. The filler pieces are made from five 11" pieces.
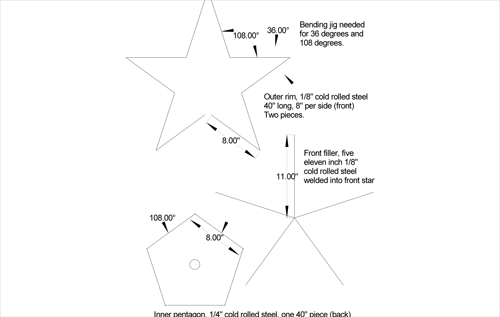
A bending jig makes this project much easier, so cut one from a piece of hardwood to use as a template. All of the tight outer bends are 36 degrees, the larger inner bends are 108 degrees.

Cold rolled steel is coated with an oily substance to keep it from rusting in the store. You can find it at big box stores like Home Depot and at most hardware stores like Ace Hardware. Clean off the protective coating using something like Goof Off and wipe the rods down so they are clean. They do not have to be spotless to weld, but the cleaner they are, the easier the welding will be.
The outer star is comprised of a series of 8" long straights. Mark the rod 8" from the end and start bending! This size of rod can easily be bent by hand, no other tools needed. I use a pair of medium sized bolt cutters to cut this rod also. Once the outer star is bent into shape, clamp it to your welding surface and weld them together.

Please note that you do NOT have to be perfect on the angle bends. You can adjust the material as you go and once you add the five 11" pieces in the center, it will correct itself for any errors you made on the bending angles. The inner pentagram is also comprised of 8" long sections, start bending away on the 108 degree jig until you have five sections that comes back to meet the start of itself. Weld that together.

With regards to welding, I use a Lincoln Electric 140HD wire fed welder from Home Depot. This is a MIG (gas) capable welder but I am just using flux core wire without gas for making these simple wireframe welds. You can get very good results even if you're new to welding with a rig like this. Make sure to clamp everything tightly so that the material cannot move once it's molten! I use the ground clamp of the welder to hold one side. Many people prefer a metal welding table and the use of magnets to hold the workpieces in place. I still prefer a heavy clamp myself as I really don't want anything to move until it's welded and cooled.
Clamped up good prior to the weld.

Welded for good now!

Don't be discouraged if your welds look lumpy, just be sure the material got plenty hot (the white hot glow is a good thing) After each weld, you can take a file (or better yet rotary grinder) to the welds to make them flat and pretty looking. Rotary wire brushes and hand wire brushes are also great to have around to clean up slag and any spatter that remains on the source material.
Some quick work with a rotary wire brush on a bench grinder or a hand drill will clean up the final product nicely.

The above picture shows one of the five filler sections welded into a star tip. Weld all five of those into place, leaving them alone in the center of the star until they're all done. Once they're all done, adjust where they meet in the center so that they're evenly spaced around each other. Clamp that down solid and then weld it up.

This section not only adds a great deal of strength to the design, it also automatically centers your five star tips just in case your bends weren't exactly perfect. ;)

Now attach the inner pentagram, first welding it's tips to the five filler pieces, then, once those are all attached and it's evenly spaced on your star, weld the sides up to the star's inner angles. This may seem like overkill but it really makes a strong structure that will withstand years of abuse, drops and other accidents without bending.
On my version, my last welding step was to take some 1/4" sized angle iron and weld together a bracket that attaches to the back of the star and provides a "foot" for it to attach to the top of the pole my MegaTree will be made from. Alternatively you could just make some 1" square flat pieces and drill holes in them for screw mounts to vertical flat surfaces.

Now is the time to get in there with a hand file, rotary wire brush or anything you have to clean up the metal. Get all of the slag and spatter off and brush it up bright and shiny so your paint will attach well to it.
I have always been a big fan of Rustoleum's metal products as I have see how well they work in bad weather conditions outside. I used a gloss white for this star and laid it on plenty thick (multiple layers) to get a finish that looks and feels like the metal is vinyl coated.

Remember, both for welding and painting inside, make sure you have excellent ventilation! In my shop I have a large room evacuation fan (seen in the upper left of this picture) that will exhaust the entire room in a matter of seconds. I keep lots of air going through it while working on stuff that generates a lot of fumes. I also use a JET brand air cleaner, mounted on the ceiling of the shop.
Now on to creating the fixture!
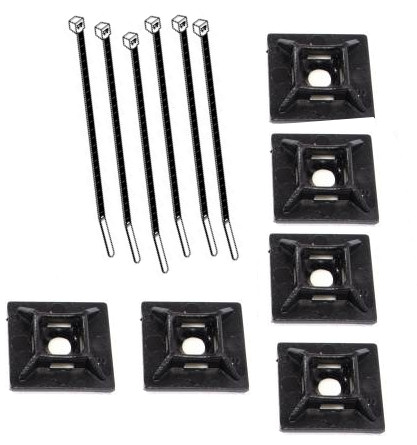
I used wiretie base brackets to set my FireFly pixels on this frame. These brackets are inexpensive, very durable but with this approach you can take them off the frame if you need to do any kind of maintenance in the future. The adhesive that comes on them won't stand up outside so I removed all of it and then epoxied the brackets onto the back of the FireFly pixels. Then it just becomes a matter of zip tieing everything on!
Here's what the ziptie anchors look like (I used white for mine though)


(Yes, I was in a hurry, attaching before the paint was fully dry and I scratched it here, had to touch it up after the fact! ;)

The Firefly controller isn't waterproof of course, so I will be mounting a small tupperware container, with the controller and it's power supply sealed up inside, on the back of this frame. The Firefly controller and power supply are very small, only use about 200 watts of power and do not put off any significant heat.
The last step was to use a small, white tinsel to wrap the wires so the star (IMHO) will look better during the day. This is obviously an optional step and you can leave it off. We used almost 100 feet of tinsel just to wrap this 22" star! If the tinsel doesn't hold up well, I will just remove all of it and use the star "bare" like the above picture.
These last few pictures show the star in static mode, with the pixels lit in different colors. I hope this How-To covered everything you need to make a Martin Firefly Star of your own!


